Monday, December 1, 2014

Pumpkin Spice Muffins

There are countless recipes you can make in a brick oven. This holiday season try baking your favorite dessert in your wood fired oven. The added flavor from this method of cooking will suprise you.

Pumpkin Spice Muffins (With Cream Cheese Frosting)

Ingredients
 Muffin Ingredients:
1 cup All-purpose Flour
1/2 cup Sugar
2 teaspoons Baking Powder
1-1/2 teaspoon Cinnamon
1/4 teaspoon Ground Ginger
1/2 teaspoon Nutmeg
1/2 teaspoon Salt
4 Tablespoons Butter, cut into pieces
1 cup (heaping) Pumpkin Puree
1/2 cup Evaporated Milk
1 whole Egg
1-1/2 teaspoon Vanilla
1/2 cup Golden Raisins (optional!)


TOPPING:
2 Tablespoons Sugar
1 teaspoon Cinnamon
1/4 teaspoon Nutmeg

FOR FROSTING:
1/4 cup Softened Butter
4 ounces, weight Cream Cheese
1/2 pound Powdered Sugar
1/2 teaspoon Vanilla

Preparation Instructions
Preheat wood fired oven to 400 degrees. Generously grease 12 muffin tins.

Sift flour, sugar, baking powder, cinnamon, ginger, nutmeg, and salt. Cut in butter with two knives or a pastry blender until it is fully incorporated. In a separate bowl, mix together pumpkin, evaporated milk, egg, and vanilla. Pour pumpkin mixture into the flour mixture. Add raisins. Fold gently until mixture is just combined.

Pour into a greased muffin pan—batter hardly ever fills all twelve unless you keep it down to 1/2 full. Sprinkle with remaining cinnamon-sugar-nutmeg mixture over the top of each unbaked muffin.
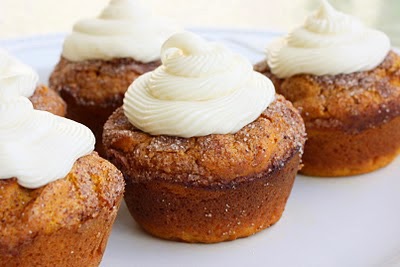
Bake for 25 minutes. Allow to cool in pan for 15 minutes, then remove and allow to cool. Ice with cream cheese frosting.

To make the frosting, mix all ingredients on high until soft and whipped. Spread onto completely cooled muffins, or place into a large pastry bag with a large star tip and go crazy! Store in the fridge, as icing will soften at room temperature.

Saturday, October 25, 2014

How-To Install a Wood Fired Pizza Oven Installation Instruction 2 of 2

Below are the basic instructions on how to install one of our wood-fired oven kits. This is part two of a two part post. View one of two here.

5. Apply a small amount of mud to the outer seams of the dome to seal the oven.  There is no need to cement in the dome pieces because the oven dome is self-supporting.  

6.Cover the entire dome with a ceramic fiber insulation blanket (sold separately).  Lay wire mesh (such as chicken wire) over the insulation to hold it tightly against the oven.  

7.If the finished oven is enclosed with masonry walls, cover it with at least 6 inches of loose vermiculite for optimal insulation.  If the finished oven is left dome-shaped, the vermiculite should be mixed with cement so that it will stick together.  Mixing ratio: 10 cubic feet of vermiculite to 45 lbs. of Portland cement.  Add water as needed.

8. For dome-shaped ovens, cover the vermiculite with 1 inch of stucco reinforced with chicken wire.  If the dome-shaped oven is left outdoors, it should be waterproofed to prevent moisture from seeping into the oven. (For further details, download our wood-fired oven installation guide from our website.)

The installation of the wood-fired oven and outdoor living space construction was done by Italco Construction Inc.


Monday, September 8, 2014

How-To Install a Wood Fired Pizza Oven Installation Instruction 1 of 2

Below are the basic instructions on how to install one of our wood-fired oven kits. This is a two part post so please check back next month for the final steps.
  1.  Construct a 4” concrete slab supported by 2 masonry walls. If space between walls is over 42”, build a third center wall. The width and length of slab will be determined by the size of the wood fired oven being installed. The slab should be large enough to have room for at least 6” of insulation (ceramic fiber blanket and vermiculite) all around. At the front of the wood fired oven, the slab should be large enough to accommodate the front arch or any other finishes (stone, bricks, tile, etc.). 
  2.  For better insulation, lay one or two rows of fire bricks over the slab or use ceramic fiber board. 
  3. Then, lay the oven floor pieces without any mortar or grout. This will prevent possible cracking due to thermal expansion. Be sure to leave enough space for the front arch. If the joints of the floor pieces are uneven, smooth them over using an angle grinder or coarse sand paper. This will prevent the edges from chipping in the future. 
  4.  Assemble the wood fired oven starting from the door pieces. Be sure that all the dome pieces fit tightly together. The space between the wood fired oven floor and the dome pieces should be left open. The ash from the first several fires will fill this space and lock the wood fired oven in place.


Thursday, July 31, 2014

Baking in a Indirect Wood Burning Oven

Baking in a Indirect Wood Burning Oven

This indirect wood burning oven isn't just perfect for pizzas but baking as well.  The indirect heat system reduces wood consumption and oven preparation time. Our Forno Classico 80 or Forno Premium 100 wood burning oven is a great choice if you are starting on your path to cooking with wood fired ovens. The Forno Classico 80 wood burning oven offers three cooking surfaces and doubles as a convection oven if you don’t need a real fire.

Chocolate Chip Cookies

2 1/4 cups all-purpose flour
1 tsp. baking soda
1 tsp. salt
1 cup butter, softened
3/4 cup sugar
3/4 cup firmly packed brown sugar
1 tsp. vanilla extract
2 eggs
1-12 oz. (2 cups) Nestle Toll House Semi-sweet Chocolate Morsels
1 cup chopped walnuts

Preheat oven to 375 F.
In small bowl, combine flour, baking soda and salt; set aside.
In large bowl, combine butter, sugar, brown sugar and vanilla extract; beat until creamy.
Beat in eggs. Gradually add flour mixture. Stir in chocolate morsels and nuts.
Drop by level tablespoonfuls onto ungreased cookie sheets.
Bake at 375 F for 9-11 minutes.
Make about 5 dozen 2 1/4 inch cookies.


Tuesday, July 1, 2014

Oatmeal Raisin Cookies

Starting your wood fired oven: After pushing the coals to the back of the wood fired oven near the wall, brush the ashes off of the floor. The chunks of glowing hardwood coals should have little or no flame when the Oatmeal Raisin Cookies goes in. After 5 minutes, turn cookie sheet so the other end faces the fire.

Makes about 4 dozen

1 cup (2 sticks) butter, softened
1 cup firmly packed brown sugar
1/2 cup granulated sugar
2 eggs
1 tsp. vanilla
1 1/2 cups all-purpose flour
1 tsp. baking soda
1 tsp. cinnamon
1/2 tsp. salt (optional)
3 cups Quaker Oats (quick or old fashioned, uncooked)
1 cup raisins

- Heat wood-fired oven to 350 F.
- Beat together butter and sugars until creamy.
- Add eggs and vanilla; beat well.
- Add combined flour, baking soda, cinnamon and salt; mix well.
- Stir in oats and raisins; mix well.
- Drop by rounded tablespoonfuls onto ungreased cookie sheet.
- Bake 10-12 minutes or until golden.
- Cool 1 minute on cookie sheet; remove to wire rack.

Tuesday, May 13, 2014

Wood Burning Oven Veggie Casserole

Starting your wood fired oven: After pushing the coals to the back of the wood fired oven near the wall, brush the ashes off of the floor. The chunks of glowing hardwood coals should have little or no flame when the Veggie Casserole goes in. After 15 minutes, turn casserole disk so the other end faces the fire.

ALL KINDS OF VEGETABLES SUCH AS:
CARROTS
POTATOES
ZUCCHINI
BROCCOLI
CAULIFLOWER
BELL PEPPERS
MUSHROOMS
ONIONS
GARLIC

OLIVE OIL, SALT, AND COOKING SPRAY

Wash and dry the vegetables thoroughly and cut them into large pieces. Spray a large casserole dish with cooking spray and put veggies into the dish. Season with olive oil and salt and cook uncovered at 350 until all the vegetables are tender and golden.

This recipe is not only delicious but very healthy as well!!

Wednesday, April 2, 2014

Wood Burning Oven Buffalo Chicken Wings Recipe


Cooking in a Wood Fired Oven: After pushing the coals to the back of the wood fired oven near the wall, brush the ashes off of the floor. The chunks of glowing hardwood coals should have little or no flame when the Buffalo Wings goes in. After 15 minutes, turn wings so the other end faces the fire.

INGREDIENTS FOR 4 PEOPLE: 
20 CHICKEN WINGS 
VINEGAR 
BUTTER 
BUFFALO WING SAUCE

WASH AND DRY WINGS THOROUGHLY. SPRAY A LARGE CASSEOLE DISH WITH COOKING SPRAY AND PUT WINGS IN CASSEROLE DISH. ADD VINEGAR (JUST ENOUGH TO SPRINKLE ALL THE WINGS) AND PATS OF BUTTER THROUGHOUT DISH. COOK WINGS AT 350 UNTIL THEY ARE GOLDEN BROWN. PUT BUFFALO WING SAUCE IN A LARGE BOWL. TOSS WINGS IN THE SAUCE AND SERVE. THEY ARE DELICIOUS!!

Monday, February 24, 2014

Advantages of a wood burning oven

A indirect wood burning oven allows a continuous and long lasting heat which helps to guarantee excellent cooking results and an even heat distribution inside the oven. You’ll be shocked at the flavor differences you get between cooking things like lasagna in a gas oven compared to a wood-fired one. Baked Ziti develops flavors in the meat and sauce that you might have thought were never possible. This short video below offers a quick look at just a few recipes created in this remarkable wood fired oven.

Forno Indirect Wood Burning Oven from dolcevita specialty imports on Vimeo.

Monday, January 27, 2014

Indirect Wood Burning Oven Offers More

What is a Indirect Wood Burning Oven?


This indirect wood burning oven isn't just perfect for pizzas. You can also cook a variety of foods link roasts, porchetta, breads, desserts, and delicious Thanksgiving turkeys. The indirect heat system reduces wood consumption and oven preparation time. The Forno Classico 80 or Forno Premium 100 wood burning oven is a great choice if you are starting on your path to cooking with wood fired ovens!  It has a stylish design and a premium stainless steel interior!

The Forno Classico 80 wood burning oven offers three cooking surfaces and doubles as a convection oven if you don’t need a real fire.    It’s perfect for the beginning food connoisseur.